


DEVELOPMENT
ONLINE
PROJECTS
|
|
|
|
|
DEVELOPMENT |
ONLINE
PROJECTS |
|||||
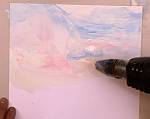
| Hot Air : Creating a blown sky effect | |
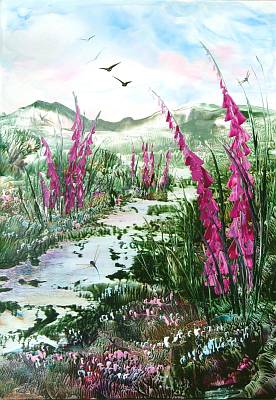 |
Larger sky areas are difficult with just the iron because there are always some edge marks left in the wax from the contact with the tool as it is lifted off the molten colour. Using hot air, either from a hot air gun or a hair dryer can eliminate this problem & bring larger area coverage into control, with pleasing results. The image (left) is demonstrated from start to finish on the DVD A Bigger Picture, when Michael Bossom introduces some of the things that help the jump to larger A3 painting card. Skies are fluid moving air combined with water vapor & coloured light. Texture & directional flow of the wax has a big effect on the final impression that these blends give the viewer. Darker, textured & angled is stormier; pastel, smooth & horizontal is calmer. Warm colourful skies are associated with sunrise or sunset. |
 |
So, down to action. Load the iron as for a
smaller sky, with white at the lower area and
the stronger colours added as you get higher up the sky zone. |
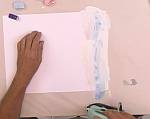 |
There is not enough wax to go all the way across, so reload in exactly the same colour way as you did initially, then start your spreading of the colour so that you overlap the previous smoothing stroke. Now you have a complete covering (if not repeat the step just described), but it will contain turbulence and possibly iron marks too. |
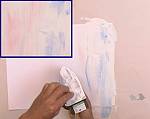 |
* See an iron mark in the lower right of the small box area? To continue building the wax that will be blown, re-load the iron with white ... |
 |
... and again spread this over the lower edge area of the card, stretching down into the still bare part of card. If you need to re-load and repeat to gain good coverage then do so. |
 |
The iron mark is very clear here, and needs to be "blown out". You can also see a hair in the wax above the iron mark. |
 |
|
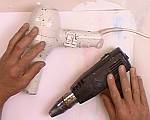 |
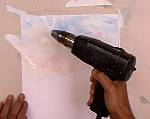
In the DVD demonstration both a hair dryer & hot air gun were used to blow the wax & show the contrasting results of each tool. Use a salon quality hairdryer that is designed for heavy use and has a safety cut out to avoid over-heating. The hot air gun here is a 2 heat setting trigger operated one from Black & Decker. Two air speeds. |
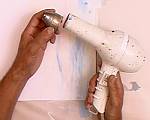 |
This hair dryer is a Fransen model, designed for professional salon use all day long. It has an internal safety switch to cut out the heating element when the air becomes too hot. This means that it can safely be used with an adapted restriction nozzle that was taken from a hot air gun set. * Without an overheat cut-out on your hair dryer you could burn out the element if the inside gets too hot! |
 |
Hair dryers blow a lot of air that is generally very warm rather than hot. So the wax melts a little but gets blown at very hard. It is rather too easy to blow holes in the wax because the area right by the nozzle becomes liquid, then immediately the wax gets blasted away. |
 |
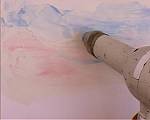
This tends to lead to a very textured set of wax threads
caused by the fast moving beads of wax being moved quickly across the card
then cooling as they get to the edge of the heated zone. *A hot air gun is easier to use so long as you keep the nozzle moving! |
 |
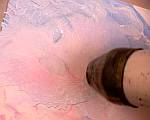
So now using the hot air gun, notice the smooth outer edges of the molten wax compared with those from the hair dryer in the image above. * Remember, it is vital to keep that hot air gun moving or over heating can occur. |
 |
So once again, the general method is to bring the whole wax sky area up to almost melting, then work across the image making the sky direction more horizontal than vertical. Horizontal conveys calm & restful. Vertical conveys an unrealistic sky form. A slight angle conveys activity & movement. The more texture then the more turbulent or stormy the sky becomes. |
 |
Keep working the sky wax across the card. You may prefer to use a rigid underboard similar to the swirl example, which then allows tilt and pan of the card to accelerate and help the wax flow direction. However, in this particular sky a camera was watching from above, so it was done flat. Excess "spent" wax is allowed to be blown right off the work area so that the sky extends out to the card boundary without any "edges" of wax being left apparent. |
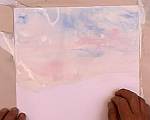 |
The iron marks are now smoothed out and a flowing fluid sky with soft blends has been created. Allow time for it to cool in a flat position before inspection. |
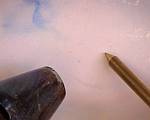 |
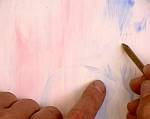
Where any dirt or hairs are spotted use the scribing
tool and a very gentle puff of very hot air - just enough to make the
wax glisten at melting point. At the moment of melting touch the dust
or hair with the cold tip of the scriber and then withdraw it again.
The dirt should be stuck to it's point now , so can be cleaned off, ready
for re-use. |
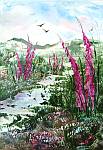 |
... and finally the sky is finished. It can then be incorporated into a landscape or fantasy image. Here the sky colours were chosen to harmonise with the main subject of foxglove flowers. Further colours found in the sky are again used in the foreground to tie in the overall rounded colour harmonics of this piece. You can see a larger version if you click "A Bigger Picture". If you click on the image you see there an even larger version appears. |
| GO TO |
|