


DEVELOPMENT
ONLINE
PROJECTS
|
|
|
|
|
DEVELOPMENT |
ONLINE
PROJECTS |
|||||
| Hot Air : Creating an encaustic swirl background. | |
 |
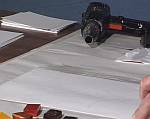
Blowing molten wax into a swirl form using the hot air gun with a restricting nozzle offers wondrous backgrounds for fantasy & other styles of work. This one uses quite a lot of pan & tilt for greater directional control. It was a demonstration for the first Arts Encaustic International BV video in 1991. Despite the intervening years the wax colours remain in perfect condition and so shall they stay ; one of the great benefits of encaustic working! |
This is the video clip from the first encaustic art video program produced in 1991. It shows Michael Bossom using a simple Black & Decker electric paint stripper to melt and blow the wax colours around and into a fantasy background. There are much more sophisticated hot air guns affordably available now, but this one did the job for many years! |
|
 |
Start by covering an A3 orA4 sized card with clear wax medium. This will enable the coloured waxes to flow easily over the entire surface rather than develop "dry" pockets or holes where no wax flows. Do this step diligently as good preparation always pays off! |
 |
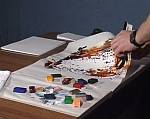
Now dribble on the wax colours that you wish to use. Here the central area was covered in white drops, then yellow was added around that, but not over the entire card. The central area is left with just white wax. As the outer areas are coloured darker hues can be used. These will help "frame" the light that will be developed in the central area. |
 |
The waxes can be dribbled off or smeared on using the iron. By dribbling you have greater control over the quantities of wax colour added into the image. Encaustic block colours are very potent, so there is no real need to develop very much depth of wax to get a vibrant effect. You just need sufficient to enable movement of the liquid waxes once they are molten, either by blowing or tilt & pan. |
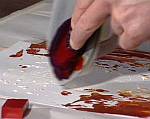 |
The darkest colour is finally added toward the outer edges. In this example the whole tone of the piece is white - yellow - brown. So a red brown (No.13) has been used at the outer border to act as the strength that will create the deepest contrast against the white inner colour. |
 |
Now that the colours are laid in place on the card it is time to prepare for the blowing action. The piece is removed from the initial table top where the colours have been added..... |
 |
..... then placed onto a rigid board that has been covered with some flat disposable waste paper. * No tape or fixings have been used here, but you can use some masking tape if you wish. |
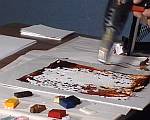 |
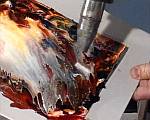
Now the hot air gun is switched on. WORK
IN A WELL VENTILATED SPACE. Initially a high heat can
be used to quickly bring the whole piece up to a melting point. You can
notice this when the wax starts to glisten. Once it is just about melting
switch to a lower heat or you will burn the wax, creating smoke. ANY
SMOKE IS A SIGN THAT THINGS ARE OVERHEATING! * The key to success is to ensure that the hot air nozzle is kept dancing around all the time, never dwelling in one place. |
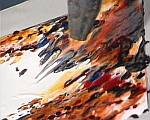 |
As the wax starts to melt and flow it is time to begin lifting the rigid board that the waxed card is resting upon and tilting it so that the wax flows out to cover all traces of the original card's surface. Keep that nozzle moving all the time or you will find the wax getting very thin and over hot. |
 |
If you have too much wax it will flow fast and be difficult to control. You are able to affect the speed of flow by altering the angle of tilt. A high angle where the board is almost vertical will create the fastest flow. Low or flatter angles will reduce the speed of flow, but if there is too much wax it will blend and puddle, leaving you with less control on how it mixes and blends. |
 |
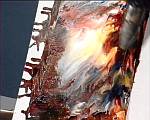
Once the whole area is covered, taking care to ensure the edges are not missed, it is time to develop the light in the central area and find ways to help it spread outwards. All imagery depends on the contrast of light and dark (unless it is one single tone). So here, the hot air is now directed into the central area .... |
 |
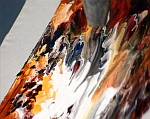
... and the colours are gently encouraged outward, both by blowing and pan& tilt tipping of the board. * Remember, a lower angle will reduce the speed of the flowing wax. By panning as well as tilting you are able to direct the wax in any of the 180degree direction options. |
 |
Tease the lighter colours outwards, working lightly and gently over the darker outer bordering ones. * Be prepared for some of the wax colour to flow right off the board, onto the work surface underneath. Make sure you have some protective paper there to catch this spent wax. |
 |
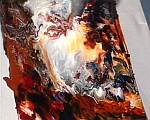
You can see now that the wax colour is being driven across
the card in an angled direction, not quite corner to corner. In the final
image this gives the feeling of expansion or bursting out. * You can see on the left side here, how the wax has over-shot the actual painting card area. |
 |
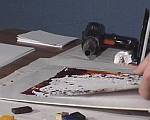
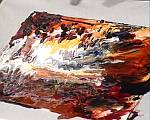
Almost finished! Notice the spots of spent wax on the waste paper beneath. You can see the colour streams at the bottom edge of the work piece as excess spent wax flows off. When you are content, turn off the hot air gun. Place it safely on a non-combustible surface. LAY THE WORK FLAT TO COOL. |
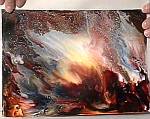 |
Once the wax is cool the forms and blends are fixed, unless you re-heat the piece. Now you can decide if further work is necessary or not. |
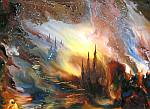 |
The background has been developed into a fantasy piece now, simply by adding some illusions of perspective. Vertical spires encourage imagination of castles and the winding diminishing horizontal lines suggest steps or a pathway. All these have been added with consideration that it is the strongest light that pulls the eye. The fantasy elements merely encourage that direction, enhancing, not fighting. |
| GO TO |
|