


DEVELOPMENT
ONLINE
PROJECTS
|
|
|
|
|
DEVELOPMENT |
ONLINE
PROJECTS |
|||||
| Hot Air : Blowing pure wax colours on a surface | |
 |
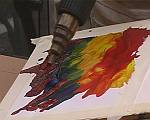
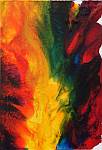
Encaustic Art wax block colours can be applied onto surfaces directly, without any clear wax underneath. However, they tend to flow more slowly & so a slightly different approach can be adopted that also enables more directional control and therefore organisation of where the actual colours will be laid. This practise piece is demonstrated on the DVD "From Hobby to Art" by Elisabeth Van Uden. Pure coloured wax blocks used like this are at their most powerful because there is no extra clear wax diluting them. Vibrant images & backgrounds can be created by this direct blowing, but for best control ensure that you have a good reduction nozzle so that the air is in a tight jet blast of force as it leaves the gun. Polish when cool for maximum saturation. |
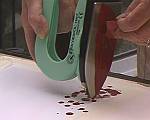 |
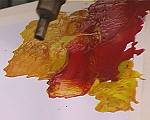
Use the iron in a vertical position then dribble off the initial colour that is to be worked. Remember, in this approach no clear wax is applied before-hand. Note: Some colours are more viscous than others.This difference affects the liquidity & flow of the various colours when molten. |
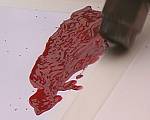 |
The hot air gun has been used to melt the initial splattering of red drops. Adjust the temperature so that it is not too fierce. Prolonged blowing in any particular area builds up the heat concentration. If it gets too hot then you may find holes forming in the wax coating. Worse still is that the card "pops" separating its two surfaces at the core, creating an unresolvable issue. |
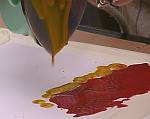 |
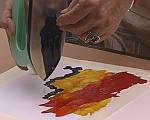
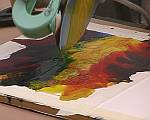
Once the initial area has been blown out into a coating then further colour is added in the same manner as before. Here the yellow is dribbled off the iron face. It is positioned fairly carefully along the border of the existing wax colour. |
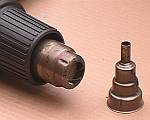 |
Time to fit a reduction nozzle. |
 |
Small orifice nozzles like this one usually have a vent
hole or holes to enable the excess heated air to escape without having
to travel through the reduction nozzle itself. It is important for maximum
control that the nozzle is attached with these vent holes facing away from
the work surface, otherwise they can affect the wax where they blow out
onto the work in progress. |
 |
Once fitted you have far more accurate control of the heated air jet as it blasts out from the gun. If you have an airflow control facility on the tool then this is a good time to explore its value. With the air flow turned down low the wax moves slowly, creating more time to choose and control. With the air flow at maximum you have the strongest blowing jet possible. This can force the wax to spread.. |
 |
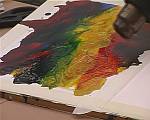
Moving on to blue, the third primary colour (red, yellow & blue), more wax is added along the working edge of this piece. Choosing appropriate colours will pay off. Where colours meet, if they are harmonic then the resulting blend will be a transition. If the bordering colours are opposite then darkness forms where they meet & blend. |
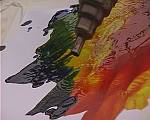 |
The affects of blowing the yellow and blue together during the work process show up in the green as some of the yellow invades the places where blue exists or has already been. * Blown encaustic art work is one of the most magical techniques for superb colour blending and fluidity of hue within the wax paint medium. |
 |
Back to adding some more red on the outer boundary, still letting the colour dribble off the vertical iron's face. Notice how far the wax has been spread out by the blowing so far. The colour blend of the yellow and blue has created quite a large green area now. |
 |
Lifting the rigid underboard means that the directional
flow of the air blast can be further amplified by use of gravity. The wax
is encouraged to blow right off, over the work area edge, so that when
the piece is finished the whole surface is covered. |
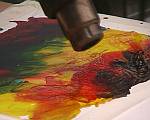 |
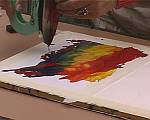
Almost there now. The main colours have been added to the support, then blown, blended and moved, mostly with the restricting nozzle attached. Here though, the main open tube of the hot air gun is used to melt and fuse the colours in a more general and less forceful manner. This relaxes the surface of the wax, evening out and lumps or lines in a soft way. |
 |
More yellow is added to boost the liquidity of the wax so that the hot air can move it with less blowing force. Lots of wax makes a more liquid piece than less wax. But each of the various colours and wax types that you might use will have its own specific character, liquidity, viscosity and flow qualities. To play with wax is a bit like learning the unique qualities of an instrument. All are different. |
 |
So now, with the wax spread out over the edges, enough has been conveyed through this demonstration by Elisabeth Van Uden. A final blow over to allow the whole thing to bond and cool as one image, then let it get cold before removing the masking tape on each edge and liberating another creation into the world. |
 |
Once the piece is totally cool the colours can be lightly
polished with a tissue pad. Some use old soft tee-shirt material, others
use nylon stocking pads for that final silky sheen. Whatever you use, polish
until there are no signs of polishing lines in the wax. * Dental technicians use water to help polish wax for perfect moulds. So dampening your final soft fabric can just add that touch of excellence to radiate out the power of colours and blends, indeed, all the work you have just done. |
| GO TO |
|