


DEVELOPMENT
ONLINE
PROJECTS
|
|
|
|
|
DEVELOPMENT |
ONLINE
PROJECTS |
|||||
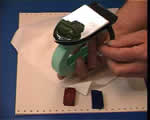 |
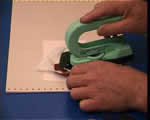
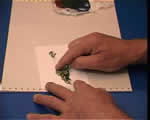
First of all get a piece of standard two ply boxed tissue (like
man sized boxed tissues) and lay it out on top of the scrap paper on your
work surface. Next melt some |
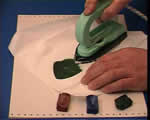 |
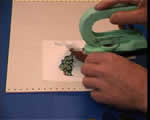
Now wipe this green colour off onto the piece of tissue that is lying ready to receive it. |
 |
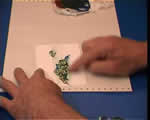
Repeat the process by loading the iron with |
 |
This time wipe off the colour with about one third of the brown overlapping the green that is already on the tissue. |
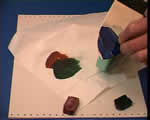 |
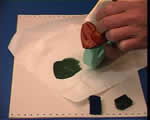
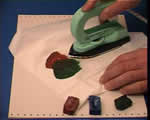
The third colour that you need to apply for this exercise is the |
 |
Again, wipe off the blue wax colour onto your tissue and try to overlay about one third of both the green and brown areas. You should finish up with a simple three colour matrix. |
 |
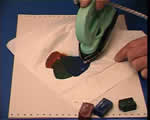
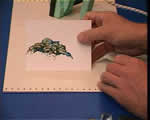
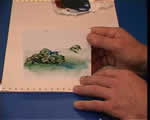
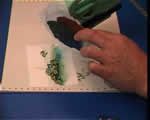
Lift the tissue off the paper and tear out the piece with the colours
on allowing a bit of extra surrounding white tissue too. Now prepare to start creating the image by placing a blank painting card on your work surface. Then lay part of the waxed tissue (greenish brown area) over the card, about half way down and towards the left side. |
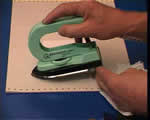 |
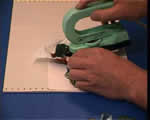
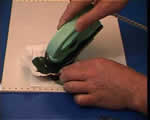
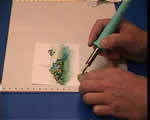
You will need to make sure that you are holding the iron at this sort of angle - maybe two fingers high at the back end - and you need to apply quite strong pressure onto the tip with the iron held as shown. |
 |
Now place the tip of the iron onto the tissue at the angle just practiced above, then make small sideways movements, about 10mm to 20mm (half an inch to an inch) whilst keeping good pressure on the tip. |
 |
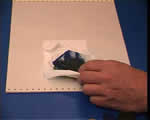
Lift up the tissue so you can see how it is progressing and what type of marks you are creating. |
 |
In my example here (taken from the Learn the Skills Video), you can see a collection of marks that resembles a pile of stones. |
 |
Now add a smaller area of similar effect but using lighter and smaller strokes. This will become a smaller pile of more distant stones in the final image. |
 |
Once the application of the stone markings has been completed using the indirect wax transfer method it is time to add water to the image. The method here is to use your finger and vigorously rub the wax in a line parallel to the top of the card. The friction will generate sufficient heat to soften (melt) the wax slightly and enable it to be smudged around. |
 |
Repeat this rubbing, again parallel to the top of the card, but this time apply the technique under the larger wax effect (the bigger pile of stones). Your results should look something like the ones below. |
 |
Here the image is starting to take form and acquire depth as the various elements combine to bring a sense of depth and weight to bear. |
 |
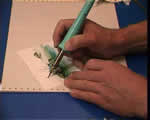
Using the edge of the iron the reed forms can be added, but you need to concentrate carefully to make sure that you start in the right place because you can not see the image whilst the waxed tissue is being used over the painting card. |
 |
Check that you are creating the grasses so they fit into the image and move the iron more slowly for this than you would if you were painting with the iron and wax directly onto card. The heat has now got to penetrate the tissue and melt the wax before the coloured traces that we need are left behaving on the image card. |
 |
When you are happy with the grasses it is time to add some details and bring more life into the image. Using the stylus fitted with the drawing tip fill the nib with gold wax ready to draw the wings of a dragonfly. (dragonfly page) |
 |
Place the first set of wings (like a double-decker bird with straight wings) above the rock pile on the left of the image. |
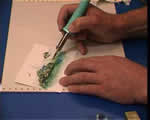 |
Then another set of wings below the waterline and more to the right - trying to keep a balance in the overall feeling of the final art work. |
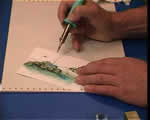 |
Add the bodies using a stronger colour if over a light background, or a light colour over a darker area of the scene. I used a greenish brown mix here.
|
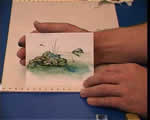 |
Finally give the image a light polishing with a clean tissue pad and then you are finished. This technique really does offer many fascinating and beautiful opportunities and because the wax is being applied indirectly it can be done onto almost any type of surface - absorbent papers, fabrics,etc. |
| GO TO |
|
