TECHNIQUES of Encaustic Art    Return to HOME PAGE of www.encaustic,com     Visit one of our sponsor sites   
Iron,  Stylus & Hobby Crafts Methods Assemble a mini hotplate using the encaustic painting iron Hotplate Techniques Zone Hot Air Methods Zone Finer Art Approaches for Encaustic work
DEVELOPMENT
IRON & STYLUS
IRON AS
HOTPLATE
HOTPLATE WORK
HOT AIR WORK
ARTISTIC
WORK

ONLINE PROJECTS

Stylus work - the low heat detail tool.


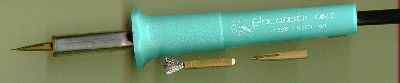
The Encaustic Art Stylus is a tool that operates at a continuous low temperature.  It works on any voltage - just plug it in.  This tool is ideal for any detailing or graphic work you want to include in your images.  Click here for a simple demonstration.

Please note the following technical advice for safe and successful usage of this unit.
1. Use a surge plug (like one for a computer). Voltage spikes can cause the delicate heating elements to blow, but the surge plug stops this occurring.
2. Only the attached tip of the stylus should be in contact with the wax. The stylus heating element (hot silver stem) should never have contact with molten wax, nor should the brass ferrule into which the changeable tips are place and secured. If wax gets into the heating stem then it can flow through the expansion hole at the bottom of the brass ferrule orifice and get into the electrical part of the tool.

Please carefully observe the following :
  1. Do not get wax (especially metallic colours) onto the heating stem (hot silver part) or into the brass ferrule (at the end where the tips attach).
  2. Be vigilant and carefully clean the tip and end of the heating stem regularly by wiping with a pad of soft absorbent tissue.
  3. Do not hold the stylus so that the tip end is higher than the body of the stylus because this causes the wax to flow down into the brass ferrule and then through the expansion hole into the electrical operation part of the unit.
  4. During operation (when it is switched on) always keep the stylus head below the stylus body. Either lay it flat on a surface or use a soldering iron type stand so that the tip end is lower than the cable end.

Currently we offer 4 interchangeable tips to fit.
All tools are available through our on-line shopping or from your National Importer

Drawing Tip

Behaves like a dipping pen tip. Rest the slotted end onto the wax and allow the heat to melt and fill the reservoir slot. Draw steadily in a flowing manner onto the painting surface. Make sure the 'slot' is in contact with the surface otherwise the wax may not flow.

Wire Brush Head

The copper wires are delicate and can easily bend, so be careful not to stab them into the waxes. If they bend gently straighten them by pulling through a tissue pad. For quantity loading rest the heel of the brush against the wax. For small amounts of colour carefully touch the wire tips into the wax. The wire fibres can be fanned out or bent into many shapes and sizes.


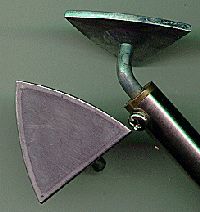
Mini iron tip

About an inch and a quarter triangle (35mm), this tip is best suited for working small images - miniatures.
It is also very handy for working small areas within a bigger image.  Again, because it is made from aluminium it can be cut and re-shaped fairly easily with metal working saw and file. Due to its large base size the low heat stylus can not re-heat it fast enough if it is used for long or large strokes.


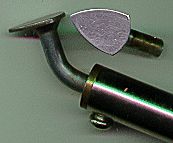
Micro iron tip

This small tip is about the size of thumb nail. It behaves much like a palette knife tip and is very versatile. It can be used flat or on it's side. When turned over the tip provides quite a fine point too. Ideal for working inside pictures and images where the normal painting iron is too cumbersome. These tips are made from aluminium and are not difficult to re-shape with a file if desired.

        GO TO Go to the index for encaustic art products OVERVIEW
Arts Encaustic Ltd, Glogue, Pembrokeshire SA36 0ED UK
  Tel: +44 (0)1239 831401               info@encaustic.com