


DEVELOPMENT
ONLINE
PROJECTS
|
|
|
|
|
DEVELOPMENT |
ONLINE
PROJECTS |
|||||
| Mandala : Structured reflected patterns of wax colour ... | |
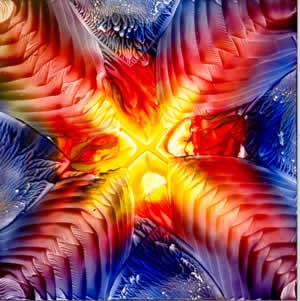 |
A mandala is a radiating image of forms and colours created originally as a means of focus and meditation. Mandalas can offer simple or highly complex structure, but the reason for exploring them here is to practice controlled structure. In the reflected pattern image two sides of a card were approached with identical technique. In this mandala we will use a square which has four equal sides. You can of course use any equally attributed shape - an equilateral triangle, a hexagon or octagon or even a round disk. |
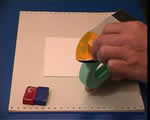 |
First cut a square of the non-absorbent painting card, then ensure that you clean the iron well. Apply a good amount of |
 |
... so that it covers the middle section as shown here. |
 |
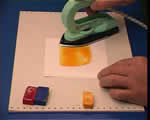
Load the top face edge of the iron with |
 |
... then spread this down one edge as a band, about one third of the way over the card. If you take a look further down this page you will see how it needs to end up. |
 |
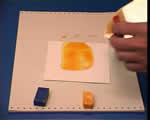
So just repeat the process of loading with |
 |
... then spreading this onto the card |
 |
... working around each edge with the same applications |
 |
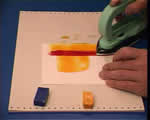
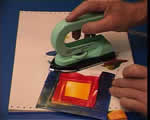
until the full square has been completed in red. |
 |
Then go onto the  border. Again load the iron in the same area as for the previous crimson
wax, but this time only spread the colour over the outer 2cm band of the
card border.
border. Again load the iron in the same area as for the previous crimson
wax, but this time only spread the colour over the outer 2cm band of the
card border. |
 |
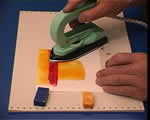
Continue this final colour band around all edges of the square... |
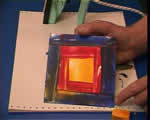 |
... until it looks something like this. |
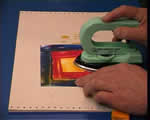 |
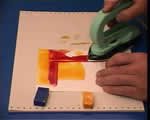
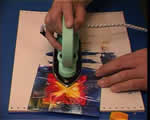
Again, clean the iron carefully to remove all dirty colour, then place the point of the iron's tip onto the center of the square and rest the body of the base plate centrally between the sides. When you lift up the iron its imprint should be in the middle of one side. |
 |
Repeat this process on each side of the square, making sure to touch the iron's tip onto the exact same central point. |
 |
Complete this first tooling set of marks ... |
 |
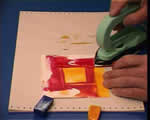
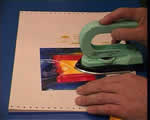
... then move onto the second set of effects. Here I have placed the tip of the iron about 2cm out from the original center and approached the positioning by covering the corner of the square card. |
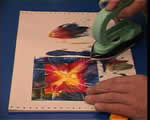 |
The stroke used is a backward wriggle, where the tip of the iron is moved from one side to the other in ever larger sweeps as the iron moves backwards and out towards the absolute corner of the card. |
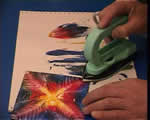 |
Repeat this stroke pattern on all four corner areas, until the pattern is structurally reflected, a bit like a four sided kaleidoscope. |
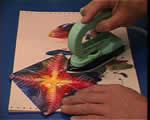 |
Finally, on this image at least, just place and lift the front area of the iron on and off the wax colour. By keeping well out of the central area these final marks do not destroy or interfere with the others already made. |
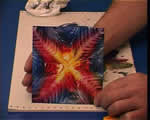 |
.. and the structured pattern, the MANDALA, is finished. Give it a quick polish with tissue and all is complete. A good mandala will be energizing and absorbing, a focus for the mind. The best ones will have a strong sense of light and energy. |
| GO TO |
|