


DEVELOPMENT
ONLINE
PROJECTS
|
|
|
|
|
DEVELOPMENT |
ONLINE
PROJECTS |
|||||
| Hot Air : Exploring Ideas hot air guns with encaustic | |||
    |
|||
Hot air blowing tools can be used in many creative ways
to work the encaustic wax colours.
Here are a few to set your mind exploring ... |
|||
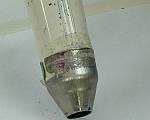
| Aluminum Sheet with Hot Air from behind ~ Michael Bossom | |
|
Heat is conducted by different materials in different ways.
One interesting aspect of using a metal as the support for encaustic work
is that it can be heated from behind effectively. It also retains heat
for some time, so opens up potentials for alternative approaches. |
 |
Wax has been coated over the aluminum printers plate here and is now being heated from behind so that it flows toward the gravitational pull. A thin metal sheet like this needs to be made rigid for long term preservation. Flexing the sheet could crack or flake off wax. |
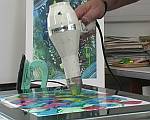
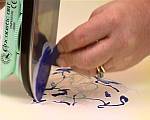
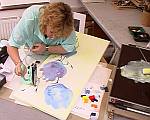
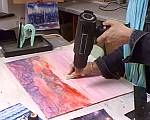
| Hair Dryer used with a hotplate for flowers ~ John Buckland | |
 |
A salon type hair dryer has been fitted here with a restriction
nozzle that came from a hot air set. Alternatively, for very low temperature
work a card nozzle can be made and taped in position. Be careful if you
do this, to ensure that the exit hole in the card nozzle is large enough
to avoid overheating of the hair dryer element. |
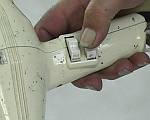 |
The hair dryer has initially been set to the lower "warm" heat and the lower of the air flow options. A higher air flow may become necessary and even the full heat, but start on the more gentle settings to determine how well the wax is flowing. |
 |
On a hotplate set high enough to melt the waxes and maintain their liquidity, a series of circular style areas have been drawn by molten crayoning. These need to be sufficient in quantity of wax so that it will move when blown. More wax colour can be added at any time. |
 |
The hair dryer is brought into close proximity, allowing the wax to move in an expanding concentric circle that reflects the path of the blown air. |
|
Keep the nozzle just above the wax. If there is too much movement and you are already on the lowest settings then move the hair dryer further away from the wax. Alternatively you may need to use a crumpled tissue to actually remove some of the excess liquid wax. |
 |
This example is shown live on the DVD Exploring Ideas and is demonstrated by John Buckland, who has done many years of exploration using hotplate techniques. Blowing combinations on the hotplate can be great for abstract & fantasy works too. |
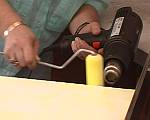
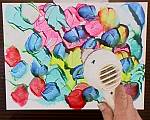
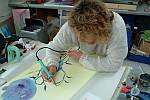
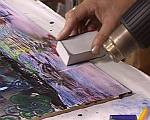
| Flowers & rollered background on Stretch Canvas ~ Beanie Cronin | |
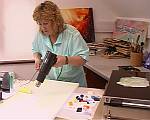 |
Beannie Cronin is an Irish artist who has worked with encaustic art since the mid to late 1990's. Beannie kindly agreed to demonstrate this blown flowers on canvas piece for the DVD Exploring Ideas Beannie uses a hotplate to act as a palette for loading the sponge roller. The hot air gun, set to a moderate temperature and air flow, is employed to warm the stretch canvas, thus liberating the wax from the roller to create a nice even coating of colour. |
|
The heat gun moves around all the time so that no are gets over-heated, and it often goes slightly ahead of the roller so that the canvas is already warmed as the roller arrives. The edges are coated too, thus creating a totally wax coloured finished item that can be hung without further framing is desired. |
 |
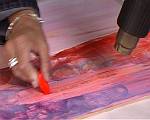
Using the iron in a vertical manner, wax colour is dribbled off on the location that the flower will be blown. Here the lighter colours were placed centrally then darker ones to toward the outer edges of the flower wax. Look at the larger picture (click small one) to gauge quantities. |
 |
The hot air gun is kept far enough away that the blast it produces does not disturb the flower wax too much, but just brings it to a molten state. |
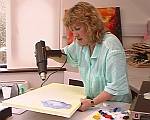 |
Once molten the canvas can be tilted and panned as well as blowing air from a variety of angles. All these things enable quite careful control of the molten flower wax as it blends and flows together. This process of applying wax, melting and blending into a pleasing form need to be repeated for each flower head. |
 |
Beannie then went on to use the stylus to add in connecting "stems", making visual sense of the weight and balance of the flower heads. Stems need to be strong enough to support the flower heads they are carrying! The iron tip proved to be the easiest tool for creating realistic looking buds and several were added. |
 |
More stylus work for stems, some leaves and bud cases. Beannie suggests that you take time to find good positioning for the initial heads and then improve this through the addition of suitably placed buds and leaves. |
 |
... and finally the piece if finished. Hot air provided the solvency for the background roller coverage and then went on to be used for the flower head "pools" as well. Many thanks to Beannie for her willingness to face the cameras! |
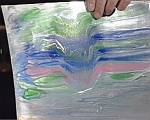
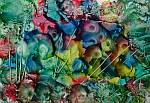
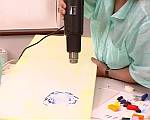
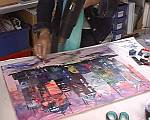
| Collage on Medium Density Fiber Board ~ Anna Maria Aigner | |
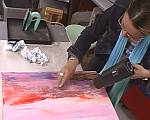 |
Anna Maria Aigner is an Austrian artist. Her work with encaustic and collage is a personal journey of exploration. Here Anna Maria is working onto Medium Density Fiber Board (MDF) which is a man made substrate that is very stable. Using the hot air gun at quite a strong temperature, Anna Maria has first melted clear wax onto the MDF and here is using a stocking pad to blend the colours then included, so as to form a sky. |
|
With heated air blowing across the board a block can be crayoned directly into position. It melts as this is done and the hot air gun is never far away, so fresh heat is arriving all the time. You can see all this demonstrated on the DVD Exploring Ideas |
 |
Further working with the nylon stocking pad subtly blends in the colours and allows various areas to be lightened or textured or smoothed out. When the sky is completed the board can be prepared for the collaged area to be created. |
 |
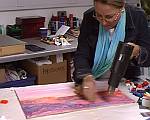
The hot air gun is providing all the heat for this project, so the main collage area is first heated, then clear wax is melt crayoned all over. This will be the "glue" that hold the paper pieces in position. The papers are cut out, then placed, then the iron is used on their surface to heat through to the clear wax and "tack" them into position. |
 |
The foreground is to be a river with sailing boats, so underneath the collage area Anna Maria has first created a wall to hide the bottom of the collage and act as a natural delineation for the river water. Now both clear and coloured waxes are incorporated into the flowing river, reflecting some of the collage colours too. |
 |
A white sponge is used on edge to create the effect of the boat sails. Anna Maria uses the hot air gun to pre-heat the place where they shall be, then removes the gun, relying on the heat already now present. The white sponge block edge is placed vertically, then drawn down and to one side in a curve to create that interesting sail shape. |
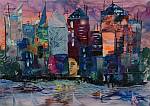 |
... and then it was finished. Just a quick polish with
that clean stocking pad and a light spray over with some fixative to
help keep the collage intact through time. |
| GO TO |
|